What Does MailChimp and Cloudflare Authentication Mean?
Authenticating your MailChimp account with Cloudflare involves configuring DNS records that verify your email identity. When you set up SPF, DKIM, and DMARC records through Cloudflare, email providers trust that your messages are legitimate. This setup prevents spoofing, improves inbox placement, and ensures your campaigns reach subscribers instead of spam folders. The process takes 15-30 minutes and requires access to both your MailChimp and Cloudflare accounts.
Why Email Authentication Matters for Your Campaigns
Email authentication is the foundation of deliverability. Without it, inbox providers like Gmail and Outlook flag your messages as suspicious. SPF (Sender Policy Framework) tells servers which IP addresses can send mail from your domain. DKIM (DomainKeys Identified Mail) adds a digital signature to each message. DMARC (Domain-based Message Authentication, Reporting, and Conformance) creates a policy that ties SPF and DKIM together.
When these three work together, your open rates climb. Your unsubscribe rates drop. Most importantly, real people see your content. Businesses that skip authentication often end up blacklisted or filtered automatically. The cost of poor deliverability is lost revenue. The cost of setup is just your time.
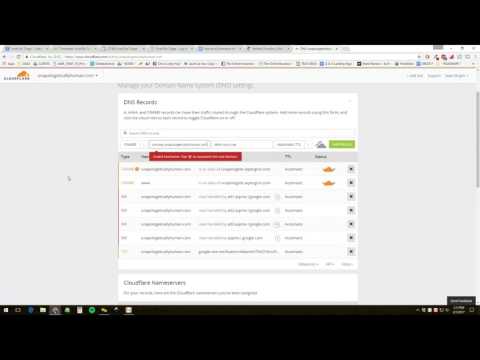
Step-by-Step DNS Configuration in Cloudflare
Start by logging into your Cloudflare dashboard. Navigate to your domain's DNS settings. MailChimp provides three DNS records you need to add. These appear in your MailChimp account under Settings > Domains > Authentication.
First, add the SPF record. Copy the value from MailChimp and create a new TXT record in Cloudflare. Set the name to your domain (or subdomain if MailChimp specifies one). Paste the full SPF value. Save it. Next, add the DKIM record. This one looks longer and includes a unique key. Use the exact format MailChimp provides. Finally, configure DMARC. This tells email servers what to do if messages fail authentication.
Wait 24-48 hours for DNS propagation. Then return to MailChimp and verify each record. You'll see a green checkmark when Cloudflare has properly published your DNS entries. If verification fails, double-check that you copied the values exactly. Spaces and character case matter.
Account Integration and Ongoing Management
Once authenticated, your MailChimp account gains trusted sender status. This opens doors for better analytics and higher volume sending. Cloudflare continues to host these DNS records indefinitely, so your authentication stays active as long as you maintain both accounts.
Check your authentication status monthly. MailChimp's dashboard shows whether records remain valid. If you change email providers or DNS hosts, you'll need to reconfigure these records. Keep documentation of your SPF, DKIM, and DMARC values in a secure location for future reference.
If you manage email authentication for multiple clients or departments, consider using tools that track DNS changes. Some email marketing platforms offer built-in monitoring. Others require manual checks. Either way, staying on top of authentication prevents delivery problems before they happen.
For businesses managing several integrated tools, finding local service professionals who specialize in email infrastructure can save significant troubleshooting time. A skilled consultant can audit your entire setup and identify gaps in one session.
Common Authentication Issues and Fixes
Most problems stem from typos or incomplete DNS records. If MailChimp can't verify your SPF record, paste it again into Cloudflare without any modifications. If DKIM verification stalls, confirm the record name matches exactly what MailChimp displays. Some users accidentally add extra characters or forget required underscores.
Another issue: DNS TTL (time to live) settings. Cloudflare defaults to automatic TTL, which works fine. However, if you recently changed DNS hosts, older settings may still exist. Clear your browser cache and wait a full 48 hours before assuming a record failed.
If emails still land in spam after authentication passes, the problem likely lies elsewhere. Check your sender reputation using free tools. Review your email content for spam trigger words. Monitor bounce rates and unsubscribe patterns. Authentication fixes delivery routes, but content quality still determines whether people engage.
Final Thoughts
Authenticating MailChimp with Cloudflare is a one-time investment that pays dividends forever. Your email campaigns become more reliable. Your sender reputation strengthens. Your business avoids the expensive problem of being marked as spam. The process is straightforward, and support teams at both MailChimp and Cloudflare respond quickly if you get stuck. Take an hour today to secure your email future.